Vape Tanks: The Ultimate Beginner's Guide
If you’re completely new to the world of vape tanks, it can feel like there is a lot to take in. But don’t worry. We’ve put this guide together to help you navigate the ever-expanding world of tanks, and it covers everything from the basics to more advanced topics.
If you're just getting started, you may prefer to read A Beginner's Guide to Vaping first or take a look at our range of vape tanks to get an initial idea about this topic.
Contents
- What is a vape tank?
- Anatomy of a tank
- Types of tanks
- Priming coils
- Filling tanks
- Cleaning vape tanks
- Changing the coil
- Adjusting the airflow
- Troubleshooting vape tanks
- When to replace your coil
- Advanced
- Glossary
- Read more
A vape tank is the part of your e-cigarette or mod that holds your e-liquid and contains the coil which vaporizes it. In most devices, the tank sits on top of the battery, which is the pen-like part on older designs and the bigger, usually box-shaped part on modern devices.
Tanks are usually cylindrical in shape, with glass bodies and a metallic top and bottom section. They have a stem running up the centre, which is attached to a coil at the bottom and leads up to the mouthpiece. The main function of tanks is to allow the liquid in the tank section to soak into the wick, which makes contact with the coil. When you activate your vaping device, the coil heats up, vaporising the liquid in the wick. The tank then replenishes the wick with liquid and you can continue vaping.
There are many different designs of tank, but the core function is always the same.
For instance, on some of the earliest models, the entire reservoir was filled with wick material, and a little later, manufacturers switched to an empty liquid reservoir but the coil used to be towards the top rather than at the bottom.
Although available in many shapes and sizes, most modern tanks follow the same design principles.
1. Tank section, usually glass or plastic, the reservoir where the liquid is stored.
2. Top section and chimney, the chimney attaches to the coil and provides an airway through the tank.
3. Drip tip, the mouth part, quite often replaceable for a more customised feel.
4. Bottom section, this is where the coil screws and makes a connection with the battery. The picture shows a bottom section with adjustable airflow.
5. Coil, this is the part which heats up to produce the vapour, very often replaceable with different versions offering differing experiences.

The Vivi Nova tank was the first modern-style clearomiser tank. It’s basically obsolete now, but it was the first device with the same basic form as most of the tanks you’ll find on the market today. The Nova was a radical redesign of an utterly forgettable CE2 tank. The new innovation in the Nova tank was a modular design.
All parts of the Vivi Nova could be changed: the top cap, the tip, the bottom assembly and tube. But more importantly, the heating element, called the head, was fully replaceable. That meant users no longer had to throw away the whole tank when the head became unusable, they just replaced that it and carried on.
Another advantage of the replaceable coil design was variety. Not only did the concept make it easy to replace worn out coils, but coils were available in a variety of resistances. Previously, if a user wanted a lower resistance tank they would need a whole new unit.
With the advent of replaceable coils, changing the resistance of the tank was as simple as swapping the coils. The idea was so popular that it did not take long for the industry to start putting replaceable coils in nearly every new tank to come to market.
Novas also had another feature that improved the older designs. It was dead easy to fill. There were no gaskets in the way that required a syringe to fill these models.
Easy filling became the trend from that point on. The CE4 (and later CE5) designs came to market shortly after the Nova. These strange-looking tanks featured a tapered design and improved e-liquid capacity along with the easy-to-fill design. They also were designed with larger eGo-style batteries in mind, fitting over the battery connector for a finished look.
Modern tanks still have a lot in common with the Vivi Nova, but everything is more polished and the user-friendliness of the designs has improved considerably. There are a few different types of modern tanks, but they all share the same basic design features. but they tend to have more in common than they do that distinguishes them.
The easiest way to separate the two most common types of tank is by the resistance of the coils that they use. “Sub ohm” tanks use resistances of less than 1 ohm, and others use higher resistances.
However, from a users perspective, higher-resistance tanks are notable because they work well with “mouth to lung” vaping. This is where you inhale in the same way as you would from a cigarette: taking the vapour into your mouth with one inhale, then inhaling again to take it into your lungs.
Modern mouth-to-lung tanks have the same basic parts as the Vivi Nova:
- A stem or chimney running up the centre, which attaches to the coil and connects it to the mouthpiece
- A removable top and bottom sections to enclose the tank.
The vast majority of tanks on the market today are “bottom coil,” which means that the coil sits at the bottom of the chimney and screws into the base of the tank.
Older tank designs were bottom-filling, so you would have to invert the tank and unscrew the bottom to fill up – basically opening it in the same was as you would when changing a coil.
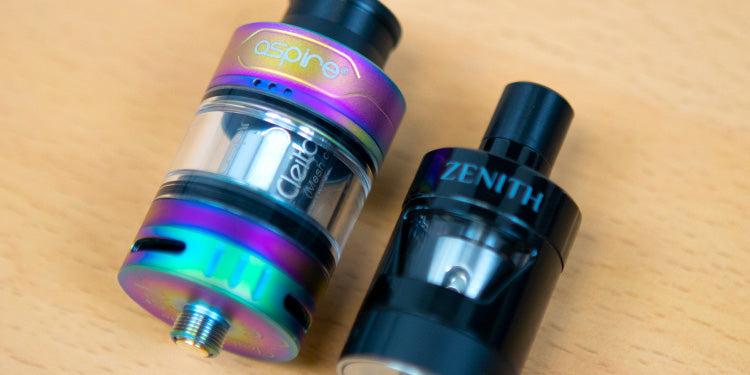
These days, though, tanks tend to be top-filling. With these, you either unscrew the whole top section to get access to the tank section, or partially open the top to get access to a fill hole. For example, the Zenith Pro tank has a top that twists around to reveal a big fill hole. These designs tend to be really user-friendly when it comes to refilling.
There are other innovations on modern tanks too, but for the most part they aren’t too different from more basic designs. Mouth-to-lung tanks often have airflow control, which gives you some control over how much air comes up to your coil and helps it produce vapour. These are usually in the form of a slot at the bottom of the tank, which you can partially cover or completely open up by turning an outer ring.
The amount of airflow is one of the main factors that distinguishes between mouth-to-lung, higher-resistance tanks and sub ohm, usually direct-to-lung tanks. Mouth-to-lung vaping is more comfortable with more restricted airflow. So even if the tanks give you the ability to adjust it, the maximum airflow will usually be less than on sub ohm tanks, and the central chimneys and coils are usually thinner too.
Modern mouth-to-lung tanks can generally be used with most types of e-cigarette. The standard connection for e-cig tanks is called “510,” and even the simpler, pen-style devices with 510 connections can support the higher resistances common with these tanks. These higher-resistance tanks also work with larger and often more complicated mods, although you won’t need some of the higher settings usually found on these devices.

The vast majority of tanks on the market today are “sub ohm” tanks. These are effectively the same as the higher resistance, mouth-to-lung style of tank. But the resistance of the coils is much lower, and generally the coils and chimney are much wider to support a higher airflow.
The defining feature of a sub ohm tank is the low resistance. Technically, any tank that takes coils with a resistance of less than 1 ohm is a sub ohm tank. We’ll cover this in more detail later on in the post, but lower-resistance coils heat up more quickly and more current can flow through them. From a user’s perspective, more liquid is vaporised per second, and this creates more vapour, better flavour and more heat from the setup.
These performance benefits are why sub ohm tanks have quickly come to dominate the market. Combined with the user-friendly features like top-filling and the simple screw in/unscrew system for changing your coils, these benefits don’t come with many downsides at all.
The Geekvape Zeus is a good example of a user-friendly sub-ohm tank. It has easy top filling which means you don't need to remove it from the device to fill it. A rotating airflow ring at the top of the tank is easy to control, helps prevent leaks and also means air travels throughout the tank to create lots of clouds and flavour.
The structure of the coil can vary on different sub ohm tanks. Most use a “vertical coil,” which is a coil aligned so its central axis points directly upward towards the chimney and the mouthpiece. These are surrounded by Japanese cotton, which presses up against the walls of the atomizer head and soaks up e-liquid through little ports cut into the sides of the atomizer head. There may be a single coil or multiple coils, with multiple coils reducing the overall resistance of the setup and increasing the amount of e-liquid vaporised with each puff.
While most coils are straightforward, there are many unique types of coils as well. For example, some tanks have coils encased in ceramic, which improves the heat-resistance of the setup and contributes to a longer lifespan. Plexus coils are a unique style of coil more comparable to a loop of mesh than a traditional coil. (For more information, see our guide to coils.)
The key point is that while there are many small differences in the designs of sub ohm tanks, for the most part, the key features are exactly the same across multiple different devices. The low resistance of sub ohm tanks means that you’ll need a mod to vape with a sub ohm tank. Sub ohm tanks can generally tolerate quite a wide range of wattages, so you have a lot of options for adjusting the sort of performance you get from your vape device.
For a more in-depth guide see our fill tutorial on sub ohm vaping.

Temperature control (TC) tanks are really just the same as sub ohm tanks, except with coils that work with temperature control mods. The coils are made from nickel (Ni200), titanium or stainless steel, and allow your mod to limit the maximum temperature your coil reaches during vaping. This prevents “dry hits” – which is what happens when you fire your coil but there isn’t enough liquid in the wick – and generally provides more consistent performance than wattage-based vaping.
Most of the time, TC tanks are really just sub ohm tanks with optional coils made from a TC-friendly coil material, so the actual tanks are effectively identical. You need a mod with TC functionality to make use of TC tanks, but most mods these days have this feature.
For more information see our full guide to temperature control vaping.
Although these aren’t used as commonly as standard sub ohm tanks, some vapers also use rebuildable tanks or sub ohm tanks with optional “RBA” (rebuildable atomizer) attachments. Again, most of these look and work a lot like a standard sub ohm tank, but the key difference is that you make your own coil for them rather than buying one pre-made. Some vapers do this to save money. Others simply prefer the control it gives them over the performance the tank provides.
The simplest type of rebuildable tank has special atomizer heads with two contact points for you to connect your coil up, or a mini “deck” at the bottom, surrounded a chamber so it works just like an atomizer head. You connect your coil to the contact points, and then insert your own wick so the liquid from the tank sections feeds up to your coil. Ordinarily, the “deck” (where you build the coil) is slightly raised, and there are four trenches around the outside that lead to the main tank for your wicks to go inside.
Other rebuildable tanks put the deck up at the top of the tank, rather than below it. This tends to give you more space to build your coil, but you need to set up the wicks in a different way. You can either use longer wicks that hang down into the main tank (a lot like earlier tank designs) or have shorter wicks that you soak manually by tilting your tank so liquid makes its way up onto the deck.
Rebuildable tanks are often called RTAs (rebuildable tank atomizers), and although they aren’t especially common, they’re one of the only other types of tanks that are still used today. You’ll need a mod to vape with an RTA, and they’re really intended for more experienced vapers.
Note: Since we first wrote this post, SMOK has released of the RPM80, which support RDAs for vapers who prefer to build their own coils.
When you get a new coil, the cotton used for the wick is completely dry. If you were to fire the coil without liquid in the wick, you’d burn the cotton and completely ruin the coil. If you have some liquid in the wick but it isn’t thoroughly soaked, the same basic thing happens to a lesser degree, and again you singe the wick and kill your coil.
This is why vapers “prime” their coils. This means soaking the wick material manually before inserting it into your tank. If you look at an atomizer head, you will be able to see the wick material in the ports around the side, and looking into the coil from the top. Get some e-liquid and soak the coil both from the top and through the wicking holes. You don’t want to soak it so much that e-liquid pools inside the coil, but you should make sure the parts of the wick you can see are wet.

After doing this, you can connect your coil to the base of your tank and assemble the tank. This should protect you in most cases, but you should also wait five to ten minutes after filling your tank to give the e-liquid chance to fully soak in. It’s better to take extra care over priming so that your coil is protected, because a bad dry-burn can completely ruin the coil, which wastes your money as well as tasting really gross.
Whether filling a top or bottom coil tank, the same principles apply.
The basic golden rule of tank filling is simple, no matter which type you have. Don’t get e-liquid down the centre tube. All modern tanks have some kind of air tube (or chimney) running down the middle inside the main tank section.
Getting liquid down the tube can cause performance problems by flooding the heating coils with too much liquid, or simply causing a mess as e-liquid leaks out.
Taking care while filling is key. Depending on the design of the tank, it may be helpful to use an e-liquid bottle with a fine tip. This allows for more precise dispensing of e-liquid. The best way to fill (with or without such a tip) is to tilt the tank and let the e-liquid run down the inside of the tank itself.
If there are markings on the tank, avoid filling past the top marking. This will ensure e-liquid does not overtop the centre tube when putting the tank back together.
If you use a new tank straight after filling, you may get a burn taste. To avoid this, let the tank stand for five to ten minutes. (See the section on priming above for more detail.)
Should you find you’ve overfilled and hear a gurgling sound when using the tank, or find liquid leaking, don’t panic. This situation is easily resolved. Remove the tank from your battery and place a paper towel over the airflow slots. Then blow through the mouthpiece stiffly to clear the excess liquid from the airway.
When filling a bottom filling tank, turn the tank upside down and, as the name suggests, fill it from the bottom. DO NOT TAKE THE TOP OFF, as this can cause a real mess! (Yes, I’m talking from experience here :) ) Again, be careful not to get e-liquid into the centre tube.
For top-filling tanks, the process is a little bit different and generally simpler. You either unscrew the top section (which also has the mouthpiece) to open up the tank section, or do something else (e.g. pushing the top cap on the Plex Tank or twisting the top on the Zenith Pro tank) to reveal a fill hole. Then simply drip e-liquid down into the body of the tank, again letting it run down the side of the tank and stopping when you reach the top marking on the tank or when it’s full.
Tanks with fill holes are easier to fill up without spilling, but if you do get e-liquid down the side of the tank, on your mod or on your hands, don’t panic – just wipe it up with a piece of kitchen roll and give your hands a quick wash.
You can also check out the movie below to see a guide to filling different types of tanks:
Naturally, tanks, like most e-cigarette components have a finite lifespan. Buildup accumulates on heating coils, plastic cracks, mouthpieces get gunky and parts wear down. However, you might be able to extend the life of your products with a little extra maintenance.
Do note that this is controversial. Some vapers believe that it is not worth cleaning coils. Some modern vertical coils are difficult to clean without damaging them. However, we believe that in general most coils can be improved with a careful clean.
Basic cleaning is simple. A simple rinse is typically enough to keep build up to a minimum in most cases. Just take apart all the components of your tank and run them through hot tap water to get any buildup removed.
The amount of disassembly you’ll be able to do depends on your specific tank. Some modern tanks – especially those with purpose-built fill holes – don’t let you remove the top cap, and so you’ll have to clean the tank and top cap as a single unit rather than separately. You can almost always remove the bottom, the coil and the mouthpiece, though, usually by simply unscrewing them.
Wicks on the head can be rinsed as well, but special care must be taken in drying. Wet wicks will not perform well as water does not vaporize as readily as e-liquid. Remove as much moisture from the wicks as possible with a paper towel. Then let the wicks dry thoroughly for at least 24 hours.
If you have a replacement head, you could always pop that in and rotate the heads. If you’re in a hurry to dry the wicks, try placing them in a sealed container of rice overnight. The rice will absorb the moisture, speeding drying time.
For particularly gummed up heating coils, you could try using pure grain alcohol, or a strong, clear liquor to soak the heads and break up some deposits prior to rinsing. Do not use standard rubbing alcohol.
At some point, though, you’ll just have to dispose of your coil. Cleaning can only do so much, and you’ll find that the amount of time your coil works well for decreases after each clean. In practice, I’ll clean a coil once or possibly twice before giving up on it and switching to a new one.

The process for changing a coil on a tank is broadly similar for most tanks on the market. The vast majority of tanks have coil heads that screw into the base section on the tank, and the base itself can easily be removed from the rest of the body of the tank. For some devices (often all-in-one style e-cigs), the coil screws into the top cap of the tank, but the process is basically the same, except you unscrew the top instead of the bottom to get access.
When changing your coil, it’s best to make sure your tank is empty. It doesn’t have to be completely empty – because no matter how hard you try that never seems to happen anyway – but it should be close enough that any excess drops can easily be wiped up with a paper towel. You can empty your juice out if you need to change coils urgently, of course.
Unscrew the base of the tank from the main body of the tank. It’s best to do this with the tank inverted in case there is a small amount of liquid left. When the base comes off, the coil will still be attached. Hold the base firmly and unscrew the coil – you’ll probably get a bit of e-juice on your fingers but you can wipe this off with a paper towel.
Prime your new coil (as described above), and then screw it into the same spot. Finally, re-assemble the tank, fill it with e-juice (remembering to wait five minutes or so before vaping to give the liquid time to soak in) and then you’re good to go.

Adjustable airflow is a fairly straightforward feature, but understanding what to do with it is important if you want to be able to tailor the performance of your tank to suit your preferences.
Essentially, most adjustable airflow systems these days have slots around the base. You can either open these up fully or cover to varying degrees by turning a ring. Some adjustable airflow controls have a series of holes, but these work in basically the same way: you can cover as many of them as you like by turning the base.
If you’re looking for a cigarette-like, mouth-to-lung vaping experience, you should close off the airflow slot/holes to some degree. The more you close it off, the tighter your draw will be, which helps you perform the two-step inhale smokers are used to. Generally speaking, this will also boost the flavour your get from your device, but will also decrease the vapour production a bit.
You should also remember that the reduction in airflow increases the temperature of the vapour, which is especially important if you’re vaping at high wattages. If you want a nice mouth-to-lung vaping experience, you’re better off reducing the wattage a little.
If you’re not as interested in a cigarette-like draw, sub ohm tanks in particular are well-suited to direct-to-lung vaping. This is a one-step inhaling process, where you take the vapour in and down into your lungs in a single inhale, and opening up the airflow as much as possible makes this more manageable. This has a few benefits, with the most notable being for vapour production. Not only does the extra air help the vapour cloud billow out, it also cools the vapour so you can vape at higher wattages comfortably.
Of course, there isn’t a “right” way to vape, so your airflow setting comes down to personal preference. You might find that closing off your airflow slot a little bit but still having it largely open gives you your perfect vape, or equally, you might like it substantially closed off or entirely open. The best advice is to experiment and see what works for you.

Tanks are central to your vaping experience, but unfortunately they don’t always work as they should. There are a few particularly common problems with tanks, so here are the basic tips for troubleshooting the issues you’re most likely to run into.
If your tank is leaking... it’s probably because one of the O-rings that help to seal the tank has degraded or because the parts of the tank aren’t screwed together firmly enough. Disassemble your tank and check the O-rings are intact (replacing them if needed) and make sure everything is screwed in properly.
It may also be that you’ve accidentally gotten juice down into the centre tube when refilling or overfilled the tank.
We have more info on this issue here.
If your mod doesn’t register your coil... something probably isn’t screwed in properly. Check that your coil is securely screwed into the base – even if it’s been working before, they do sometimes get looser in use.
The other possibility is that your tank isn’t properly screwed into your mod. Try to reconnect and see if this rectifies the issue.
If not, it’s possible that the connection at the bottom of the tank isn’t properly making contact with the mod, although modern devices tend to have spring-loaded contact points to prevent this issue. If there is a flat-head screw in the bottom of the tank, try loosening it a little bit and reconnecting.
If nothing seems to be working, try installing a new coil. Finally, if that still doesn’t work, try the tank on a different mod (or vice-versa) to clarify whether the problem is with the battery section or the tank.
If you get a burnt taste... you’re vaping without enough liquid in your wick, or your wick has gotten singed. Firstly, check to see if you have enough e-juice in the tank, and if not, fill up. Try lowering your power setting too, because vaping at too high a wattage can lead to a burnt taste.
If you have enough e-juice and reducing the wattage doesn’t help, there is some problem with the wick. Not priming your coil can cause a burned taste, whether because you haven’t left long enough for the juice to soak in before starting to vape, or because you’ve previously done this and burned the wick. Unfortunately the only way to solve the problem in this case is to switch to a new coil and follow the advice for priming your coil from earlier in this post.
Your coil could also be clogged with gunk which is preventing juice from properly soaking into the wick. In this case, you can clean the wick to try to fix the problem, but if this doesn’t work you’ll need a new coil.
If you get a gurgling sound when you inhale... your coil is flooded. This has many potential causes, but the fix is really always the same: you need to clear the liquid somehow.
You can sometimes accomplish this by blowing directly down into the mouthpiece of the device to force any pooled e-liquid out through the airflow slot. If possible, empty your tank and get access to the coil. You can directly clear the liquid from the coil when you have access.
The bigger challenge is preventing flooding from happening again. To prevent this, you can increase your wattage, switch to an e-juice with more VG and try not to inhale too sharply when you vape. Also, make sure you aren’t getting juice down into the centre tube when you fill up.
If all else fails, flooding can be a sign that you need to replace your coil.
Coils don’t last forever. In our experience, coils can last anywhere from a couple of weeks to a couple of months, depending how often you use it. Cleaning may extend the life but eventually you will need to replace the whole coil.
You know the coil needs changing when it starts to give a burnt taste, give weaker vapour production or just stops working.
If you have a modern tank, you can just replace the coil head as described above and keep using your tank, and with a rebuildable you can wrap a new coil and replace the old one with it.
To really understand how vape tanks work, you need to take a bit of a deeper dive into electronics, and specifically the property of resistance. This helps you get a feel for what exactly is going on in your vape tank, as well as why sub ohm tanks generally produce more vapour than their counterparts.
Heat is created by the coil inside your tank.Electricity is passed through the heating coil wrapped around your wick. The coil provides resistance to the electricity. As the energy can’t be fully conducted, it has to be turned into a different form. In the case of a coil, it is turned into heat.

The amount of resistance a coil offers is measured in ohms (symbol: Ω).
If the resistance is high, less electricity will pass through the coil if you keep a fixed voltage. So to produce more heat, you can use a coil with a lower resistance. However, as more energy is used in producing the heat, a battery with a higher amp output is required and you will use up your battery more quickly.
People’s preferences are very different, so a resistance that works for one person might not work for you. To find the best coil for you, you will need to experiment with different resistances.
Lower resistance
- More heat
- More vapour
- Reduced battery life
- Stronger throat hit
- Increased e-liquid usage
Higher resistance
- Less heat
- Less vapour
- Smoother throat hit
- Longer battery life
- Reduced e-liquid usage
At E-Cigarette Direct, we offer vape tanks that support coils with a huge range of resistances. From the 1.8 ohm coils of the Aspire BVC CE5 and the Nautilus Mini BVC to the 0.12 ohm coil (and slightly higher-resistance options) included on the Smok Prince TFV12 Prince.
The huge range of resistances in coils can make it difficult to find the right setting for a specific coil. In the earlier days of vaping, where higher-resistance coils were very common, vapers would produce resistance charts like this to suggest the best settings for different resistances. However, these charts don’t really have as much use these days, because lower-resistance coils can support quite a wide range of wattages.
The best advice for finding the right setting for your coil is to check the manufacturer’s recommendation. These are generally printed on the coil head itself (or will be indicated on the site that sold you the coil or the manufacturer’s website), and will ordinary indicate a range of settings (e.g. 30 to 60 W). It’s best to start towards the lower end of this range and increase your setting gradually until you find a level that suits your preferences.
510 Connection: The standard connection used to screw tanks into mods. Previously, some devices used other threadings but 510 is pretty much universal now. Older clearomizers may use “eGo” threading but 510-to-eGo adapters are available.
Airflow control (AFC): The various systems incorporated into tanks that allow the user to control the amount of air reaching the coil. Usually this is a slot which can be covered or opened up.
Base (of a tank): The bottom section of the tank which has the 510 connection and supports the glass tank section from underneath.
Bottom coil tank: A tank where the coil screws into the base, sitting towards the bottom of the tank.
Bottom dual coil (BDC): A coil head that screws into the base and contains two coils instead of one.
Bottom filling tank: A tank where you remove the base to gain access to the tank section and add your e-liquid. You have to invert the tank to fill on these models.
Bottom vertical coil (BVC): A coil head that screws into the base, with the axis of the coil pointing directly up towards the mouthpiece so the coil stands vertically.
Cartomiser, cartomizer, carto: The cartridge technology preceding the word tank
Chimney/stem: The central tube running up the middle of the tank from the base or coil to the mouthpiece. This helps you draw air up to the coil from the airflow slots, and gives the vapor a clear route up to the mouthpiece.
Clearomiser, clearomizer, clearo, tank: Different words for vape tanks. Increasingly, the word tank alone is being used, and clearomizer is used to refer to older designs.
Coil, atomiser, head, heater: The bit of the tank (often replaceable) that heats the liquid Drip tip/mouthpiece: The opening at the top of the tank you inhale through. “Drip tip” is an outdated term but it is still used, while mouthpiece is a clearer description.
Dry puff/dry hit: When you try to vape without enough e-liquid in the wick. This tastes very unpleasant and can ruin your wick and coil.
Direct-to-lung (inhale style) (DTL/D2L/DL): Where you inhale from your device and down into your lungs in a single breath, like when you smoke a shisha/hookah.
E-liquid, liquid, e-juice, juice: Words for the liquid designed to be used in an e-cigarette
Mouth to lung (inhale style) (MTL): Where you inhale from your device with one breath, then into your lungs with another, like when you smoke a cigarette.
Priming: The process of pre-soaking the wick in your coil head to prevent you from burning or damaging it when you start to vape.
Resistance: A material’s opposition to the flow of electrical current, measured in ohms.
RTA/RDTA/RBA: Rebuildable tank atomizer/rebuildable dripping tank atomizer/Rebuildable atomizer. All tanks that allow you to make your own coil rather than buying them pre-made.
Sub ohm/sub ohm tank: A resistance under 1 ohm / a tank supporting coils with a resistance under 1 ohm.
SS, Ni/Ni200 and Ti: Stainless steel, nickel and titanium, used for temperature control compatible coils.
Temperature control (TC): A technology that allows you to limit the maximum temperature your coil reaches, allowing more consistent performance and preventing dry puffs.
Top cap (of a tank): The top section of the tank which contains the mouthpiece and allows the chimney/stem to be connected to it.
Top coil tank: An older tank design where the coils where connected just below the mouthpiece, at the top of the chimney.
Top filling tank: A tank where you unscrew the top cap or adjust it to reveal a filling hole to gain access to the tank and add e-liquid.
Variable voltage/variable wattage (VV/VW): Vaping devices which allow you to control the amount of electricity going to your coil.
Wick: The absorbent material used to soak up your e-liquid and keep some of it in close contact with the coil. Usually cotton, but silica, ceramic and other wick materials are also sometimes used.
Finally…
Did you get some value out of this blog post? If you did, and you think others would too, I’d really appreciate it if you shared it using one of the share buttons on this post.
Thank you ;)
If you are new to electronic cigarettes, I recommend you read the following: